Rosman, NC for the ~BrewBus event long drive up mountains with the StealthBus.
2010 06 13
Fitted new aux charger. Connected charge detection box. Need to clean up wiring.
Fitted the extra charger bolt.
2010 05 29
Driver seat fitted, new seat belt.
Passenger seat removed
Fixed interior light – then it stopped, possibly blown?
New aux battery charger (from saveabattery) arrived.
2010 05 22
Cable set completed for high speed charging. Connections now possible added to Charger page
Added to Battery log
2010 05 07
StealthBus official cruise, towed SB to 4th stop and planned to drive last section. There was an accident right in front of us, which basically aborted the cruise (1 mile in) for Mindy and I while waited for the police to give statements. No one on the VW side hurt. SB did some official laps around the hotel with various people – still was a great weekend!
2010 04 28
Coming up on 500 EV miles!
Added to Battery log
Round trip work is running consistently at about a 4.2kWh recharge both ends. So estimated cost of $0.60 vs $3.00 for my Ford explorer… not bad.
2010 04 24
Found out something today… the electric bus runs great even in torrential rain… the charger warning light flickered a bit when I drove through a particularly large puddle… mmmm….
But drove a total of 58 miles, with a 3hr recharge (14A/110v) at Nigel’s place… arrived home with the pack reading 140.2v (eeee… that’s a bit too low, 100% DOD not good.)
This experience has spurred me to complete a high speed charging cord, so I can take advantage of handy dryer/welder/range outlets that are within 50ft of a parking spot.
Since there is a wonderful range of different connectors for high power connections I plan to make one long cord and a series of short converter cables.
Bus main inlet is turn lock 2P 3W 30A connector
Welder outlet at shop is 2P 50A looks like a “big plug”
I have an old range cord with a 4P 3W 50A looks similar to the welder but just has another pin.
At work they have a 110v/20A with the turned pin, so that would be handy too to get the 33% faster charge.
2010 03 30
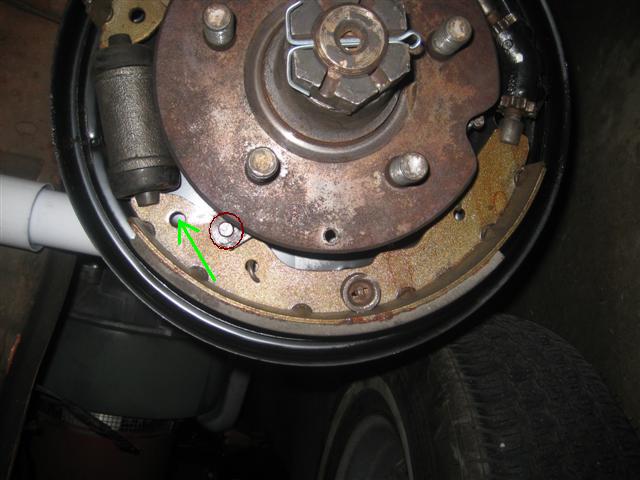
So here goes, look in the picture below ’72-early 73 brakes are unique in the fact they have 4 holes on each shoe. So it turns out the anchor pin should be in the top hole (green arrow) not the one it currently attached to (red circle). Later model (and earlier by the way) shows have 2 holes and a slot. Mystery solved, e-brake holds perfectly…